Creating your List
An email marketing list is an integral part of setting up your campaign. You’ll want to ensure that you create your list first and add subscribers to it. Don’t forget no one wants to receive emails they didn’t ask for, so make sure you upload subscribers that have agreed to receive emails from you. Let’s create your first list.
CREATE YOUR LISTS
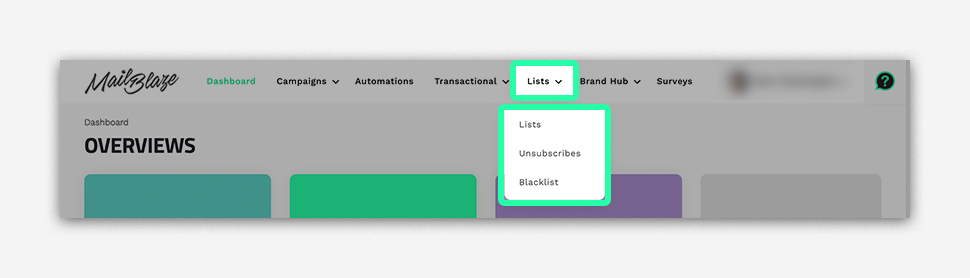
FIND IT HERE: LISTS > LISTS
On your DASHBOARD, you’ll want to select LISTS > LISTS as per below.
SORTING OPTIONS
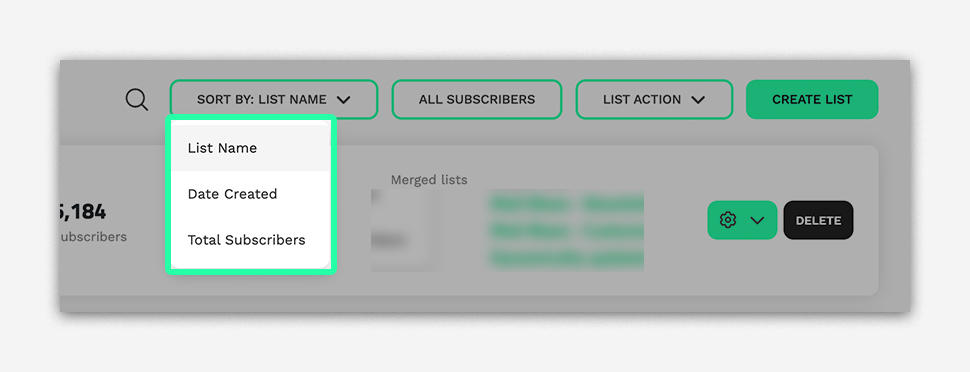
You can organise your lists using the Sort By option.
You can sort lists by:
- List Name – Alphabetically for easy reference.
- Date Created – View your newest or oldest lists first.
- Total Subscribers – See which lists have the most or fewest subscribers.
This makes it easier to quickly locate and manage your lists, especially if you have multiple lists.
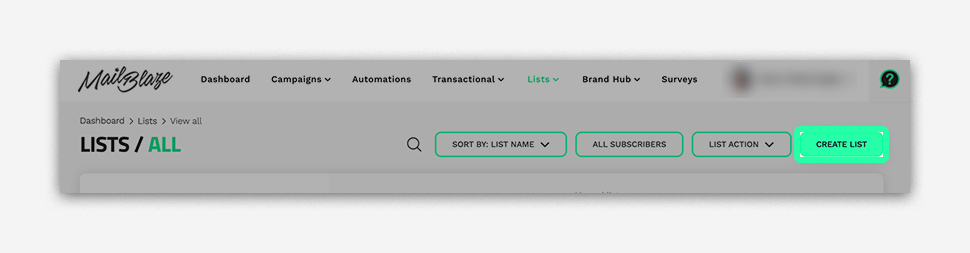
Select CREATE LIST.
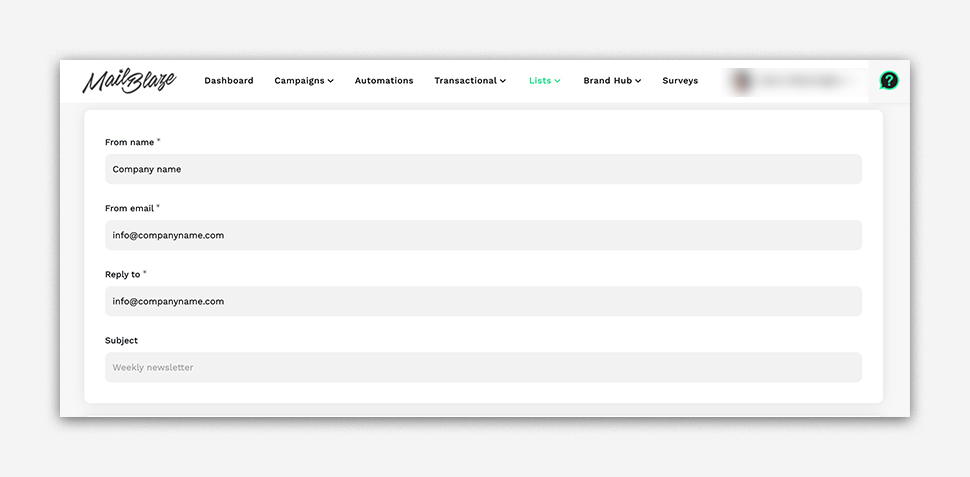
YOUR LIST DETAILS
Enter specific details regarding the list you want to create with the form provided.

RECOMMENDATIONS FOR ADDING GENERAL DATA TO YOUR LIST DETAILS:
NAME
When naming your list, make sure that it is easy to recognize.
DISPLAY NAME
This is optional as it will display the list name automatically.
DESCRIPTION
Enter a description that provides more information about the subscribers that belong to it. This is just for your reference.
OPT-IN
At Mail Blaze, our opt-in is set to double opt-in by default. You can choose between double and single opt-in.
What is double opt-in?
Double opt-in requires a subscriber that signs up manually (though a signup form for example) to click on a confirmation link in an automated email that is sent to them. If they do not click on the confirmation link, they are still added to the list, but their status will remain unconfirmed until they have clicked on the link.
Unconfirmed subscribers are omitted from being sent emails.
It is good practice to require subscribers to double opt-in because:
- it ensures that they are legitimate subscribers
- subscribers who double opt-in are more likely to engage with your email campaigns
- It leads to better data hygiene
What is single opt-in?
Single opt-in does not require a subscriber to click on a confirmation link in an automated email that is sent to them; they are added to the list immediately. While this may be simpler to do, if they enter an incorrect email address, there is no check for them to ensure that emails are sent to the correct address.
NOTE: When uploading subscribers in bulk, they are automatically confirmed, so they will not receive a confirmation email after your upload.
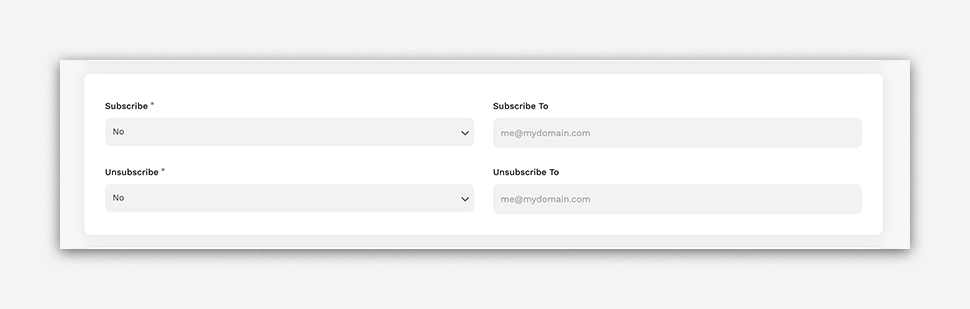
OPT-OUT
Like opt-in, you’re able to select whether or not a subscriber has to click a confirmation link in an email in order to stop receiving emails from you.
We recommend that you choose the single opt-out setting if you are unsure as it can lead to unnecessary frustration and negative brand perception if you make opting out hard.
WELCOME EMAIL
Making people feel welcomed and loved is never a bad idea. A welcome email is a great way to introduce your brand and create excitement around the type of content that you will be sending to your new subscribers. This email is sent as soon as a subscriber has been confirmed on your list.
Find out more about customizing your welcome email on the FORMS & EMAILS section below.
SUB. NOT FOUND REDIRECT
In the unlikely event that a user tries to unsubscribe, but does not actually exist on your list, they will see a default message saying that their email can’t be found. If you would prefer to send them to a customized page, please enter the URL to that page in this field.
SUB. EXISTS REDIRECT
You should set this if you want your subscriber to see a specific URL if they try and sign up again. If they have already been added to your list, by default they will see an error message.
Using this field enables you to show them a different screen.
SUB. REQUIRE APPROVAL
Your business may require you to manually approve all subscribers that you add to a list. If this describes you, you can set this field to Yes. Your subscribers will then only be confirmed once you’ve approved them.
ADVANCED LIST SETTINGS
SENDER DEFAULT INFORMATION
If you want to use the same send details for your campaigns, you may want to consider filling out the default Sender Information fields. This can save you time when setting up your campaigns.
NOTE: You can edit this information for every campaign you set up under CAMPAIGNS.
NOTIFICATIONS
Notifications can keep you informed every time somebody subscribes or unsubscribes to the list. You can also choose to send notifications of subscriptions to a different email than unsubscribes or add multiple emails to the notification list by using a comma to ensure a group of people are notified as needed.
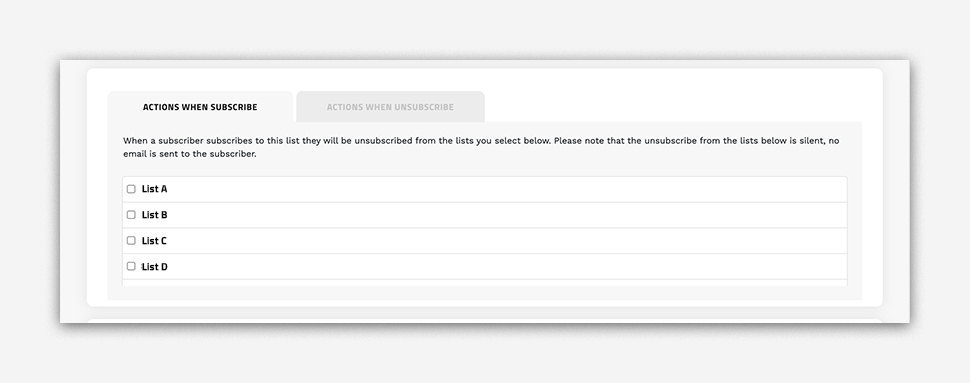
SUBSCRIBER ACTIONS
Mail Blaze allows you to create actions when a subscriber is added or unsubscribes to a list.
You can choose to customise actions when:
- users subscribe
- when users unsubscribe
Subscribe actions could include:
- Signing a user up to multiple lists when they sign up
Unsubscribe actions could include:
- Unsubscribing users from multiple lists when they unsubscribe
NOTE: You will only see these actions when you have multiple lists.
COMPANY DETAILS
Company details should appear in the footer of your emails to follow best practice guidelines. By default, we use the company details that you entered into the signup form on the Mail Blaze website here.
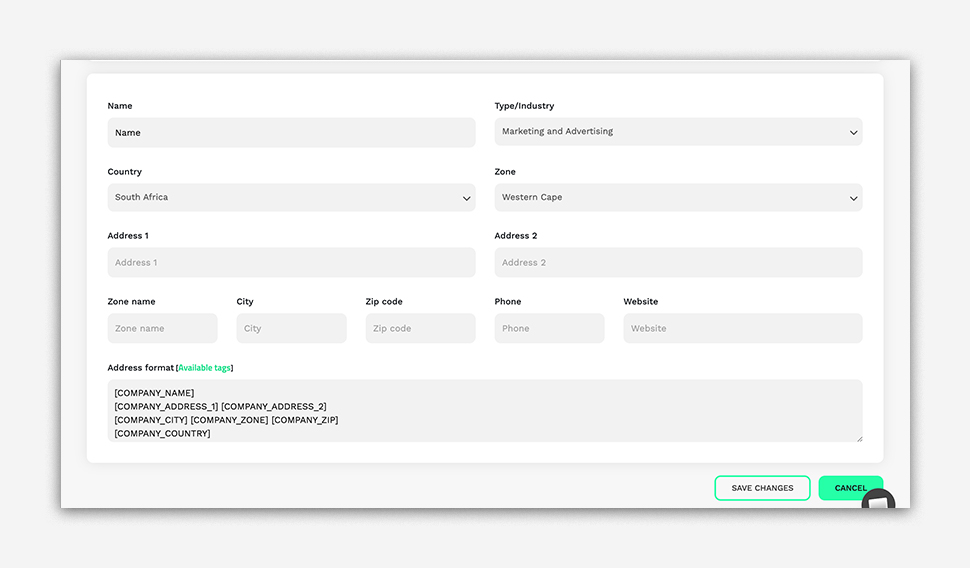
In this form, you will see there is a specific Address format field. A number of tags appear here. These tags can be used in your campaign templates to easily display corresponding information in your form.
An example to illustrate:
[COMPANY_NAME] would display “Mail Blaze” when the email is viewed by a subscriber.
NOTE: You don’t need to edit the Address format tags directly. These tags can be used in email templates to display the data in the Company Details form.
SAVE CHANGES
If you are happy with all the information you’ve entered you can select SAVE CHANGES to save all the changes you’ve made.
Please double-check your information before selecting SAVE CHANGES.
IMPORT YOUR SUBSCRIBERS
Now that you have filled out all the information related to your list, you’ll be able to import your subscriber list.
You can import your subscribers by uploading your subscriber list using either one of the following 3 file formats:
- Comma-separated values (CSV files)
- Text (TXT files)
- SQL Import

CSV FILES (files with a document extension .csv)
The most common format used to import your subscriber list is a CSV file. This file format is extremely popular as you can easily create these files in Microsoft Excel, Google Sheet or other spreadsheet applications you may already be familiar with.
CSV files allow you to create multiple columns, which could include Email addresses, names and other specified data.
An example of a CSV file format:

After all your data has been added, export the spreadsheet as a CSV file.
Now that you have your CSV file we'll guide you through how to upload it.
Select CSV as your import method from the options shown on the IMPORT TYPE SCREEN.
Drag your file into the section where you see, UPLOAD FILE or alternatively click on the section and choose your file from where it is located on your computer via FILE EXPLORER or FINDER (Mac OS).

Your file will now upload. Once your file is uploaded, select the CONTINUE button.

SEND OPT-IN CONFIRMATION EMAIL

By selecting "Schedule opt-in campaign," a confirmation email will be sent to your subscribers, ensuring their willingness to remain on your list. This practice fosters engagement and keeps your community well-informed!
For a personalized touch in the confirmation message, simply click on "Customise Opt-In Campaign"
Once you selected "Schedule Opt-in Campaign", and your import is finished, a confirmation email will be sent to your subscribers.
CSV IMPORT: MATCHING COLUMNS

We’ve got a great feature to help our system match up your column to your form fields - called list matching. During the CSV import, the system will read the column headings contained in your CSV file and automatically suggest fields. For example a column containing email addresses will automatically be suggested by the system as an Email field. Other fields such as First Name or Last Name will also be detected by the system.
We know most of our clients gather more form fields however which aren’t linked to the above field and therefore have created a super easy way for you to match column headers to form fields. If you have lots of custom fields in your list, this is a great way to tell the system exactly what you are using and create custom fields you can use when you personalise your campaigns down the line.
All you need to do is use the BELONGS TO dropdown on the right-hand side of your screen and select how the system will take action on the column you have in your CSV file.

ACTIONS:
You can now tell Mail Blaze exactly what action you want the platform to take on that field within your list. You can choose: Create a new field: This ensures that you are able to select a type of field, a label and tag for that field. Skip Column: Don’t include the column in your list upload. Automatic field creation: Basically take what’s there and the system will do the rest.
If you choose Create new field you will need to define its Type, Label and Tag.

Type: What kind of custom field are you matching?
Text: Selecting text tells the system to defines the column as a text field and the values for it shall be recognized by the system as type text. PLEASE NOTE: This is the generic class for all fields (even numbers such as ID number, or even phone numbers).
Date: Selecting date defines the field as a date field.
Textarea: Similar to text field. This allows for multiple lines of text, or longer text to be imported such as comments.
Label: If you perhaps have the option for subscribers to choose certain categories they want to belong to, you will use a label. This will be the descriptive name for the field. PLEASE NOTE: This field’s Label is visible to your subscriber when they are using your Subscribe form and also when they Update their profile on the Profile form.
Tag: The tag can be accessed in your campaign builder for personalization. You can use the INSERT function in the text editor to find the available Tags from the list you are sending the campaign to. See Custom Fields.
Skip column: This skips the column. All values following the column heading will also be ignored during the import process.
Automatic field creation: The system will create the field for you. The column name will be used as the Label and Tag.
For existing fields: This will display the system default fields: Email, First name and Last name.

When you have matched all fields in your CSV export file, you can finally press CONTINUE to begin the import process of your file to the list.

NOTE: If blacklisted email addresses are included in the list upload, they will be recognized during the upload process. However, they will remain in the blacklist section to ensure that emails are not sent to these addresses.
TXT FILES (files with a document extension .txt)
If you have a simple list that only contains email addresses, using a TXT file to upload your subscriber list would be best. This file format does not need to have an email header column, but your email addresses should be on separate lines in the file.
An example of a TXT file format:

Select the TXT file containing your list and UPLOAD.
SQL IMPORTS
If you would like to import subscribers directly from a MySQL database that you have access to, then this is an option. Provide the connection details in the form provided to connect and import your subscriber data.

NOTE: During the upload process, you may see some emails that failed to upload. This may mean that the email address already exists on the list (there were duplicates), or because the email address itself is in an invalid format.
You’ve now successfully uploaded your subscriber list!
MANAGE YOUR SUBSCRIBERS
Now that you have uploaded your subscribers, you may want to view your list of subscribers.
VIEW YOUR SUBSCRIBER LIST
You can view your subscribers under MANAGE SUBSCRIBERS > VIEW SUBSCRIBERS in the sidebar menu.
Under VIEW SUBSCRIBERS, you’ll find your subscribers details.
NOTE: If you have custom fields, or if you uploaded subscriber data in additional CSV columns, you’ll see that their information is included along with their email address.
Under PROFILE INFORMATION, you'll see Mail Blaze Score. This score provides a quick and powerful snapshot of how engaged each subscriber is with your email campaigns.
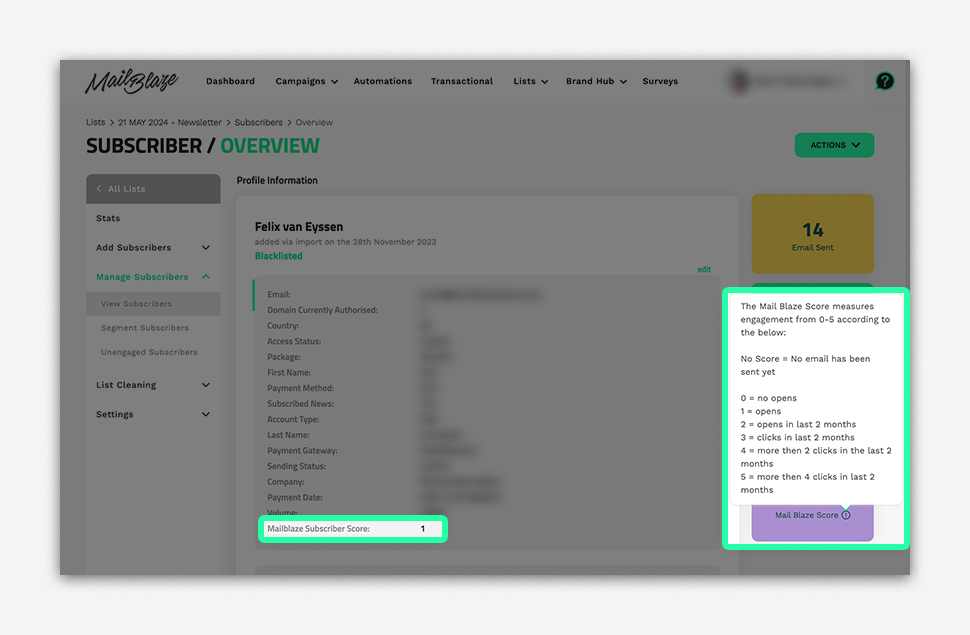
The Mail Blaze Score is a subscriber engagement rating that ranges from 0 to 5, helping you identify who is actively interacting with your content and who may need re-engagement. It allows you to make smarter segmentation decisions, improve targeting, and maintain a healthy list.
The score is calculated based on recent engagement behavior, specifically opens and clicks. Here's how it's defined:
- No Score means No email has been sent to this subscriber yet
- 0 : The subscriber has no opens recorded
- 1 : The subscriber has opened at least one email
- 2 : The subscriber has opened an email in the last 2 months
- 3 : The subscriber has clicked at least once in the last 2 months
- 4 : The subscriber has clicked more than twice in the last 2 months
- 5 : The subscriber has clicked more than four times in the last 2 months

FILTER THROUGH YOUR SUBSCRIBERS
You can filter subscribers in your current list by using SEARCH CRITERIA function for your subscriber. A form will drop down which allows you to filter by any data available in any of the fields. Select the filter criteria you want to use and select SUBMIT to filter.

LIST ACTIONS
When you are managing your lists there are certain actions you can perform namely export, copy and bulk actions.

EXPORT
You can export your list easily.
Select ACTION > EXPORT. A CSV file will automatically start downloading.
NOTE: Only confirmed subscribers will be exported.
COPY
You may need to copy confirmed subscribers from one list to another (or from one segment into another).
Select ACTION > COPY. You can then select your LIST or SEGMENT you wish to copy from.
NOTE: Only confirmed subscribers can be copied.
BULK ACTION
The bulk action functionality allows you to make changes to a batch of subscribers in bulk.
Select ACTION > BULK ACTION. Now upload a file that contains all the subscribers you would like to update, and then select an action that you would like to match against them. You can choose to subscribe, unsubscribe, disable or delete as a bulk action.

NOTE: This is not the list import ability, for list import go to ADD SUBSCRIBERS > IMPORT SUBSCRIBERS.
SEARCHING FOR SUBSCRIBERS ACROSS ALL YOUR LISTS
If you need to find a subscriber that belongs to multiple lists or you simply don’t know which list they belong to you can easily find them by following the steps below.
- Navigate to your main lists page. You will find this page on your dashboard Menu. Select LISTS > LISTS
- Now select ALL SUBSCRIBERS
- Use the SEARCH CRITERIA to filter by using the subscriber data you know and select SUBMIT. You can enter the email address in the field provided or use one of the other filtering options to find what you need.
You can also run an action on your filtered subscribers by selecting LIST ACTION and then selecting the respective action you would like to complete.
You will see the number of the selected subscribers displayed in the top left corner of the form.

NOTE: Please double-check that you have the correct filters in place before running any actions. The action is irreversible.
CREATE CUSTOM FIELDS
Custom fields allow you to store more information about your subscribers. These fields need to be captured at the point where they sign up and can be extremely useful as they will allow you to create segments. Custom fields are also generated when you upload a CSV file that contains additional columns.
You will see the existing fields (Email, First Name & Last Name are available by default)
Segments are groups of subscribers based on a specific condition. You can separate out subscribers based on the information you have about them. There is more information about segments in the next section.
There are 2 ways to create custom fields:
- Via CSV Upload
Provide a column header with the values in the column and upload the .csv file

- Create them manually:
Click SETTINGS > CUSTOM FIELDS in the sidebar menu.
Click ADD NEW FIELD and select a field type. These field types will display in your signup form. You can hide them by clicking VISIBILITY > HIDDEN.
Enter the field label in the field provided.
Enter the tag value in the field provided. Tags can be used when creating segments, including them as an option in a sign-up form as well as be used in a template tag to display the value.
NOTE: The tag needs to be in capital letters without any spacing.
There are a few custom field options:
- Text field
- Drop-down field
- Multi-select field
- Date field
- Date & Time field
- Textarea field
Fields like dropdown and multi-select allow you to provide multiple options for a user to select when signing up to your list.

To make use of your new segment, add the field into your sign up form allowing subscribers to enter in their details. There is more information about how to add fields into your form in the FORMS & EMAILS section below.
SEGMENT SUBSCRIBERS
Segmenting your subscribers allows you to separate them into groups based on one or more conditions.
An example:
You have a CITY column with the cities that your subscribers live in where they can select their city. Some live in “Cape Town”, some live in “London” and some live in “New York”.
Your CSV file would look like this:

This data can now be used to create 3 segments:
- Cape Town
- London
- New York
HOW TO CREATE A NEW SEGMENT:
FIND IT HERE: LISTS > LISTS > MANAGE SUBSCRIBERS > SEGMENT SUBSCRIBERS > CREATE NEW
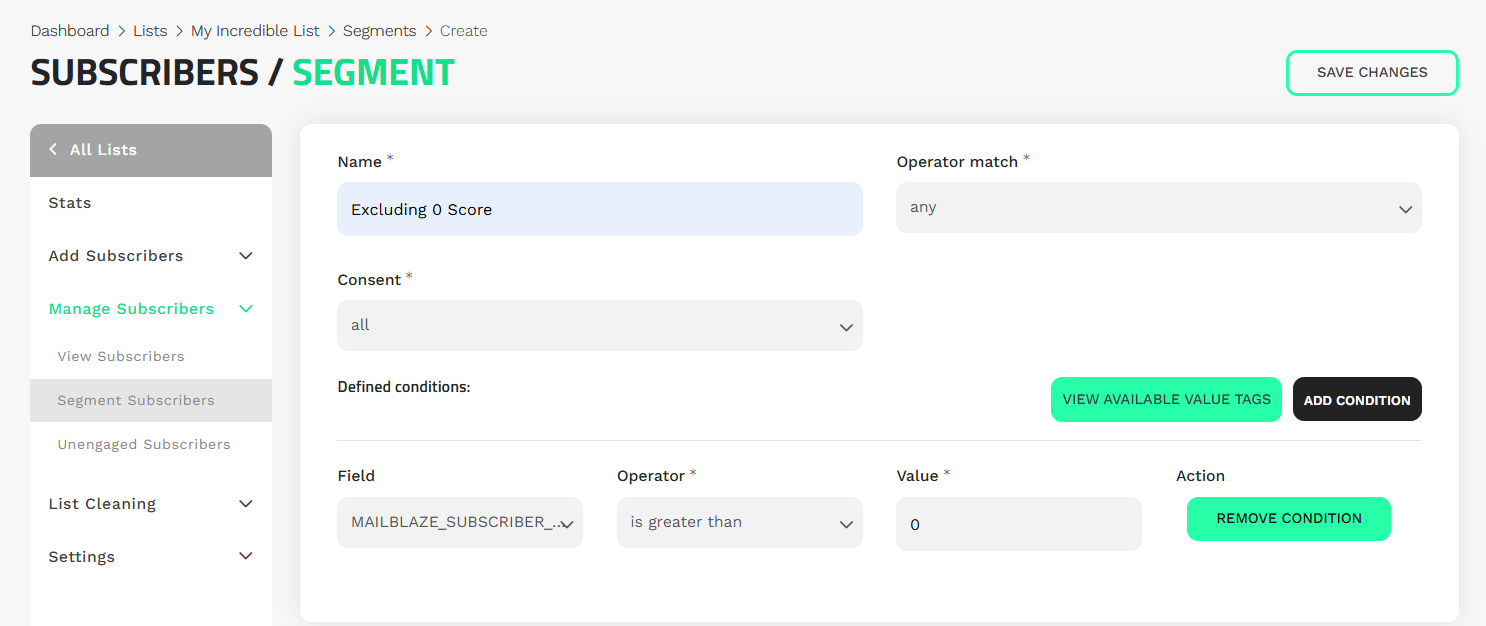
NAME FIELD
Now enter the name of the segment into the Name field. In our example, it would be the name of a city.
OPERATOR MATCH
The Operator match setting specifies whether the segment should contain subscribers that match any of the conditions (it includes all subscribers that match 1 or more conditions) or all conditions, meaning that subscribers are only included in the segment if all of their conditions are matched.
| Operator | Meaning | Example | Result |
|---|---|---|---|
| Is | Matches an exact value. | Country is South Africa | Only subscribers from the Philippines will be included. |
| Is Not | Excludes an exact value. | Status is not Active | Everyone except Active subscribers will be included. |
| Contains | Value appears anywhere in the field. | Email contains “gmail” | Matches any email that has “gmail” in it. |
| Not Contains | Excludes any value that appears anywhere. | Job Title not contains “Manager” | Everyone except those with “Manager” in their title will match. |
| Starts With | The value begins with the stated characters. | First Name starts with “Ma” | Includes names like Maria, Mark, Mae. |
| Ends With | The value ends with the stated characters. | Email ends with “.edu” | Targets emails from educational institutions. |
| Is Greater Than | For numbers, selects values above a point. | Score is greater than 50 | Includes subscribers with scores higher than 50. |
| Is Less Than | For numbers, selects values below a point. | Score is less than 100 | Includes subscribers added before that date. |
| Not Starts With | Excludes values that begin with the stated characters. | First Name not starts with “A” | Removes anyone whose name starts with A. |
| Not Ends With | Excludes values that end with the stated characters. | Email not ends with “.com” | Includes everyone except those using .com addresses. |
Any: subscribers that match 1 or more conditions All: only subscribers that have data that match all specified conditions
Choose ADD CONDITION when you have set your preferences. Then select the field that you want to use to group subscribers that match the condition in the current segment and SAVE CHANGES.
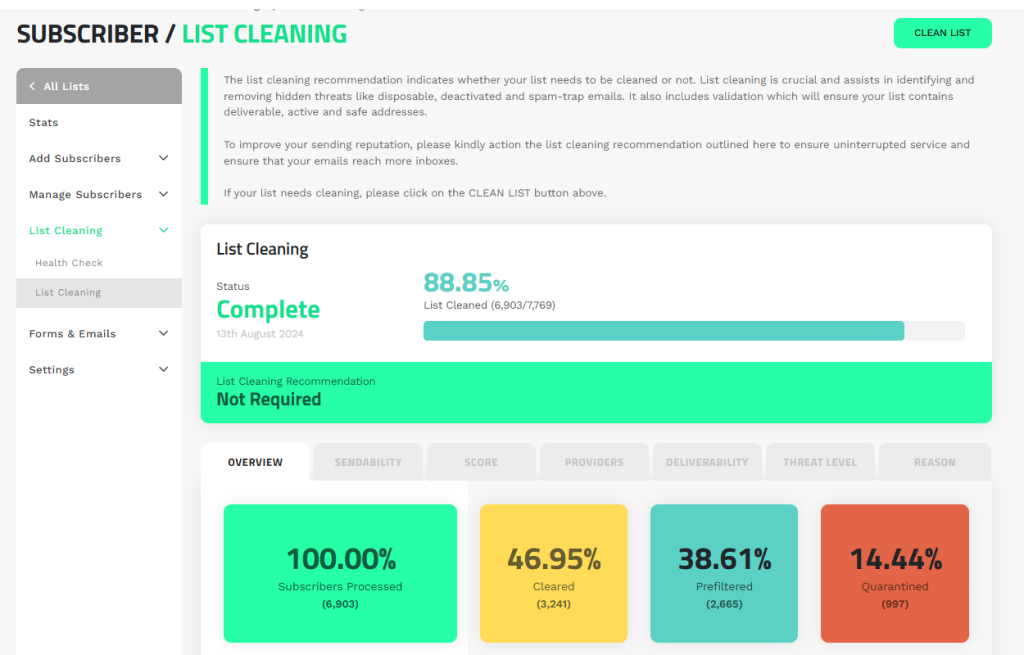
LIST CLEANING
When it comes to email marketing, one of the most crucial factors for success is maintaining a clean and up-to-date email list. A cluttered or outdated list can damage your deliverability, sender reputation, and engagement rates. This is where list cleaning becomes essential. The good news is, you can clean your email lists with Mail Blaze to ensure maximum performance.
HEALTH CHECK

To begin cleaning your list, click the CLEAN LIST button located on the right-hand side of the List Health Check menu. The platform will automatically calculate the cost of cleaning your list.

Once you click CLEAN LIST, the cleaning process will begin.
PLEASE NOTE: You will be billed immediately for the list cleaning, and no refunds will be issued.
The cleaning process may take anywhere from a few minutes to several hours, depending on the size of your list. During this time, the status of your list will show as Processing, and will change to Processed once the cleaning is complete.
LIST CLEANING
The list cleaning recommendation tells you if your list needs cleaning. It helps identify and remove issues like disposable, deactivated, or spam-trap emails, ensuring your list contains only deliverable, active, and safe addresses.
After the cleaning process is finished, you’ll have access to your detailed list cleaning report. The report contains the following tabs: Overview, Score, Providers, Deliverability, Threat Level, and Reason.
To learn more about our LIST CLEANING service you can click HERE
LIST STATS
The Stats Overview page displays your data visually.
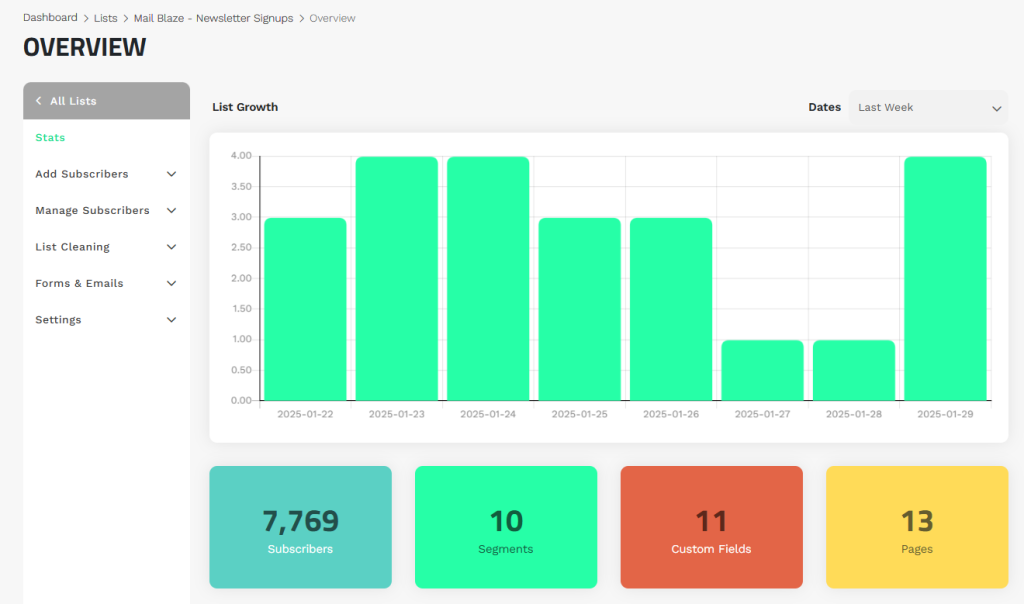
This area provides a snapshot of your list’s structure and size:
- Total number of Subscribers – The total active contacts currently in the list.
- Total number of Segments – Total segments created for targeted sending within the list.
- Total number of Custom Fields – Shows how many custom data fields you've added (e.g., First Name, City).
- Total number of Pages – Reflects how your list data is split into pages for easier management.
LIST ACTIVITY AND CAMPAIGN SENT

Visualize your subscribers’ engagement patterns using trend graphs that show:
- Total Emails Sent
- Opens
- Clicks
- Unsubscribes
CAMPAIGN SENT: This graph displays the email campaigns that have been sent to the list.
ENGAGEMENT AND EMAIL CLIENTS
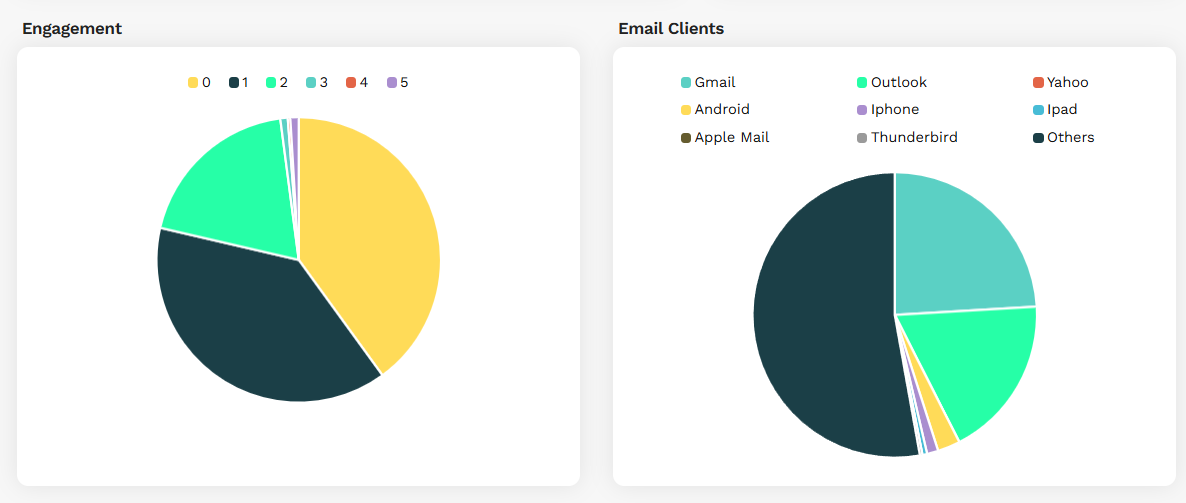
EMAIL CLIENTS: You can also view which email clients your subscribers are using to open your campaigns (e.g., Gmail, Outlook, Apple Mail, mobile vs. desktop).
RECENT ACTIVITY
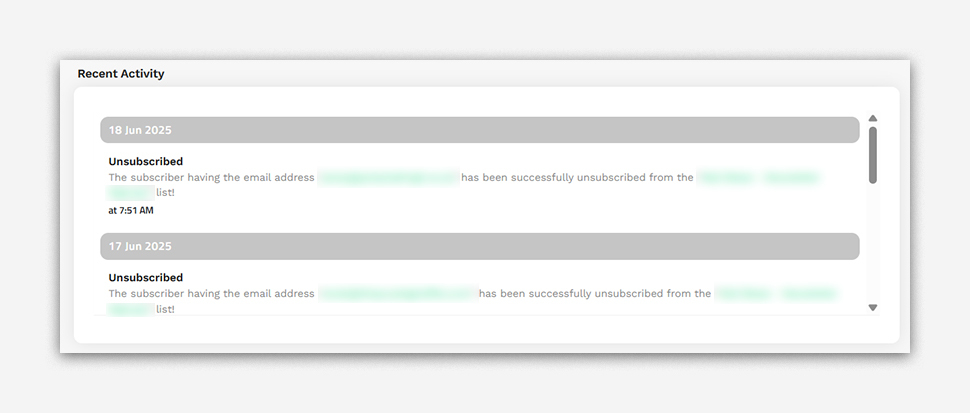
Any recent activity such as campaigns being scheduled, and users unsubscribing will be listed in this log.