Creating your Campaign
Now for the fun part, creating your beautiful email campaign.
To start, you’ll need to have created a list. If you have not created a list yet, you can find out how to create your lists here.
Select CAMPAIGNS > CAMPAIGNS in the navigation bar to head to the Campaigns page. Here you will see all your existing campaigns.

SORTING OPTIONS
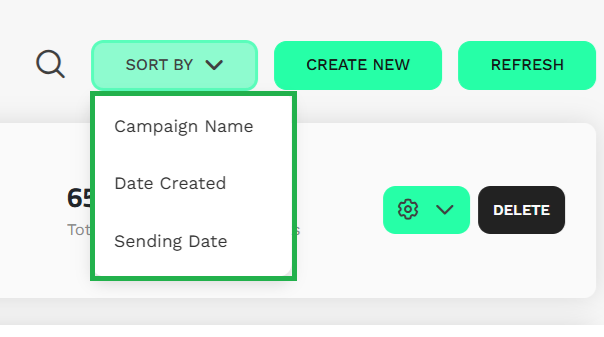
You can organise your campaigns using the SORT BY option.
You can sort campaigns by:
- Campaign Name – Alphabetically (helpful if you follow a naming convention).
- Date Created – See the most recently created campaigns first.
- Sending Date – View campaigns based on when they were sent (or scheduled to be sent).
This makes it easier to quickly locate specific campaigns, especially when managing a large number of sends.
Once ready, select the CREATE NEW button to create your campaign.
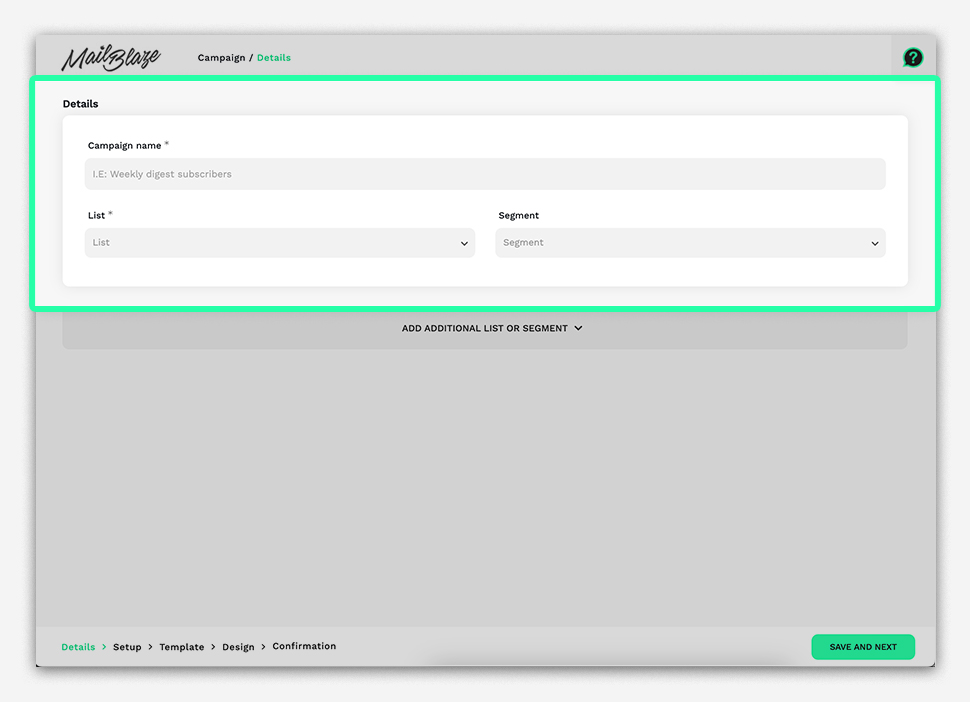
CAMPAIGN NAME
This is only for your reference and will not be seen by your subscribers. Name your campaign something that will be easy for you to reference.
LIST
Select the list that you’d like to send the campaign to.
SEGMENT
If you have created segments in your list, select which segment you’d like to send the campaign to. Find out more about segments on the CREATING YOUR LIST page.
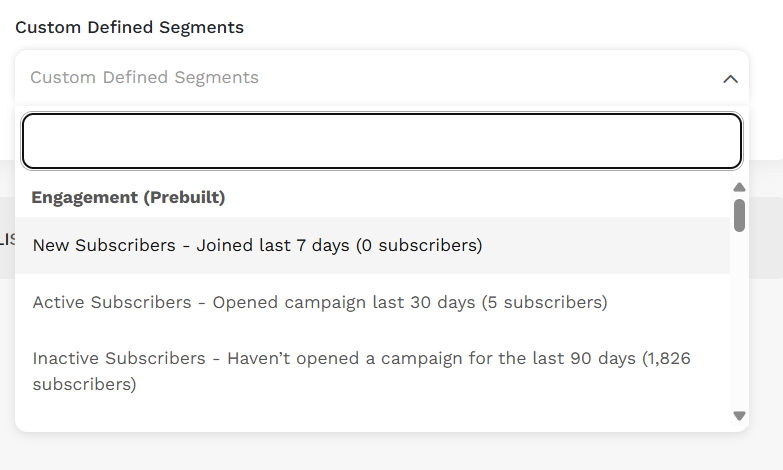
Prebuilt Segments Available You also have prebuilt segmentation available that you can immediately use when sending campaigns:
- New Subscribers
- Active Subscribers
- Inactive Subscribers
- Devices (based on the device used to open emails)
These can be selected directly when choosing your recipients for a campaign.
EXTRA RECIPIENTS Should you wish to send your campaign to more than one list or segment, expand ADD ADDITIONAL LIST OR SEGMENT.
Enter a MERGED LIST NAME. If this field is left blank, Mail Blaze will automatically generate a merged list name for you.
If you want to select another segment within the same list, select your current list from the List dropdown field and select the second segment from the Segment dropdown field.
To send to a second list, select ADD NEW LIST AND/OR SEGMENT and select the list that you like to include. The segment option is not necessary.
Once you’ve entered your campaign details, select SAVE AND NEXT.
The next step is to enter the information that is relevant to your subscribers.
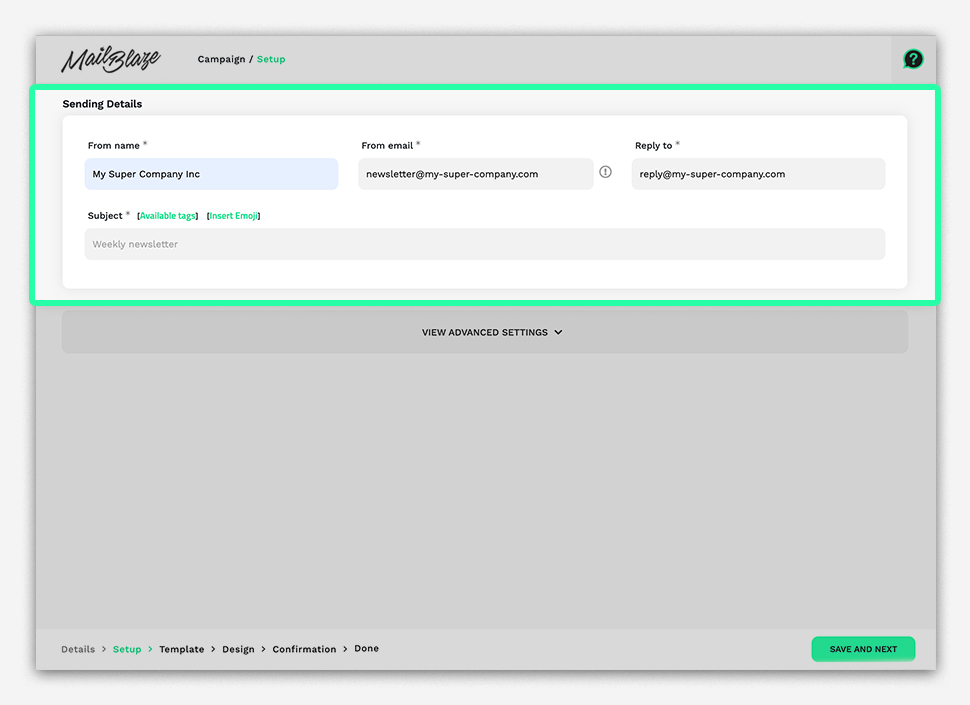
FROM NAME
When a subscriber receives the email from you they will see who the email is from in their inbox preview. Try to make sure that they immediately know that the email is from your company or brand so they are not confused as to why they would have received the email.
FROM EMAIL
Like your From Name, your From Email address should also be familiar to your subscribers.
Your From Email address is important because email networks and security software scan it to make sure that the email is legitimate and can be trusted. It is a good idea to use your website domain, or an email domain that has the correct records in place.
To improve the reliability of your email address and to help improve delivery, it is necessary that you set up your SPF, CNAME and DMARC records in your domain’s DNS file to authenticate your domain. Moreover, it is important to note that this is now a mandated requirement by Yahoo and Google. Failure to comply with this will result in the inability to send a campaign.
REPLY TO
Sometimes subscribers may want to reply to your email. Enter an email address where they can contact you directly should they have any questions or comments.
If you’d prefer that they don’t reply directly to the email address that you use, you can use a no-reply address, but make sure that you clarify how they can reach you in your email template.
TO NAME
The safest option to address subscribers is to use their email address because this is information that you’re guaranteed to have. However, if you have stored their first names, you can use the [FNAME] tag to address it to them directly.
SUBJECT
Each campaign should have a relevant subject line so that it’s easy for the subscriber to scan and get an idea of what the email is about. Make sure your subject line is enticing to drive your subscriber to open your email campaigns and engage with your campaigns.
Don’t be afraid to personalize your subject line by using tags. A tag that might generate their first name for example is a good place to start. We would however only recommend to do this occasionally and to ensure that you have your subscribers' names stored in your lists. An emoji can be added as well. Although using emojis can add a visual appeal to your subject line, keep in mind that not all email clients or devices may display emojis consistently.
If you want to learn more about subject lines, feel free to read some of our thinking on subject lines on our site today.
Once you’ve added all your campaign details, select SAVE AND NEXT to select your template.
OPEN TRACKING
Once your campaign has been sent out, you’ll be able to track a number of metrics, including how many people opened your campaign. By default, open tracking is enabled, however if for some reason you’d prefer to turn it off, select NO.
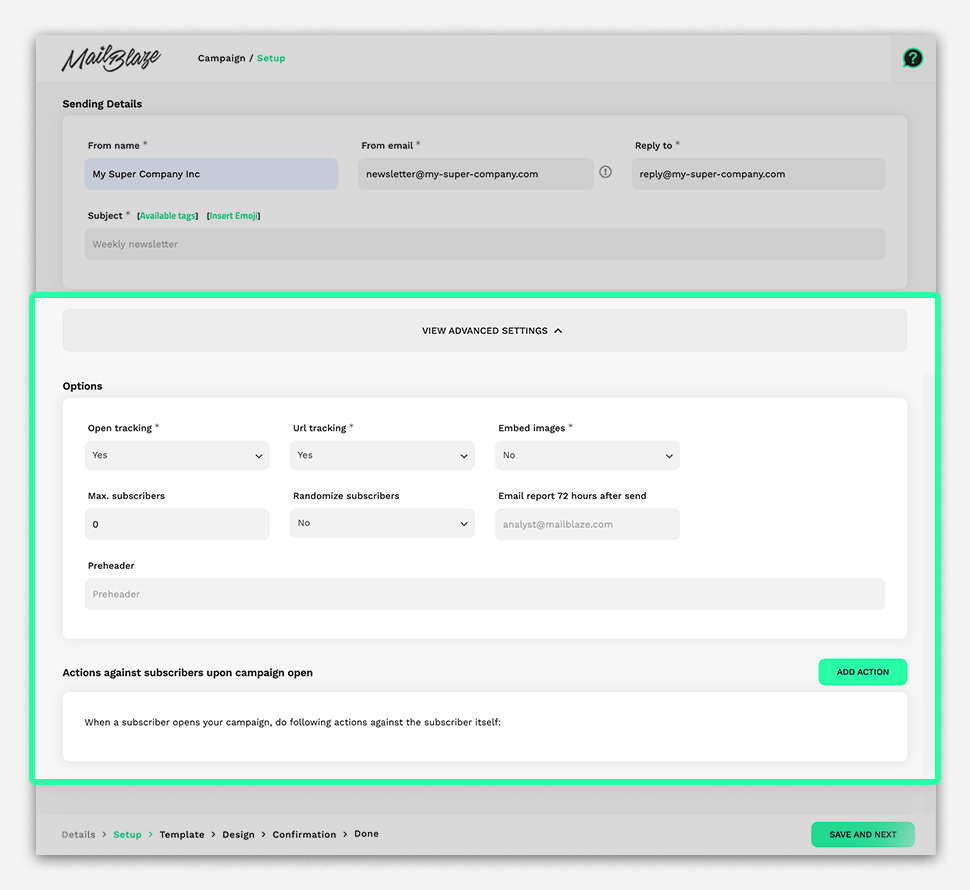
URL TRACKING
Another metric that is tracked are the links in your email template. Our platform is able to track all links in your campaign, without you needing to add any complicated code. When a subscriber clicks on a link, they first click on a tracking link and then are redirected to the actual link. This redirection allows us to help you see which of your links are clicked on in your campaign report. Helping you ensure that you effectively measure and optimise your campaigns.
If you’d prefer for the subscriber to be taken straight to the original link without first being directed to the tracking link, select NO. This will mean there will be no link data in your campaign reports.
EMBED IMAGES
When a subscriber opens an email that contains images, they’re sometimes asked if they’d like to download the images. This setting is set by the email clients, but the images will be downloaded automatically if you are one of their contacts, or if they have allowed images in your emails to be automatically downloaded. It is a good idea to have some text in your template asking subscribers to add you to their address books as this will help with images displaying automatically.
Select YES if you would like to attempt for the images to be downloaded automatically.
NOTE: A lot of email clients will override this setting - Outlook in particular.
MAX SUBSCRIBERS
If you’d only like to send a specific number of emails instead of to your whole list, then specify the maximum number of emails you’d like to send in this field.
RANDOMIZE SUBSCRIBERS
If you have selected a number of maximum subscribers, the subscribers will be sent the emails in the order that they appear on the list. If you’d like to randomize the subscribers, select YES.
EMAIL STATS
Enter your email address if you’d like to be sent the statistics for the campaign.
EMAIL REPORT 72 HOURS AFTER SEND
If you’d like to receive the campaign stats 72 hours after sending a campaign, enter your email address in this field. If multiple email addresses, separate them by a comma. Leave empty to not send stats.
PREHEADER
By default, the preheader is the first text in your email template that displays after the subject line in the inbox preview. A preheader allows you to set a line of text that you’d like the subscriber to see after the subject line instead. It’s important to know that not all email clients show preheader text and that you will not be shown your preview text in the template itself.
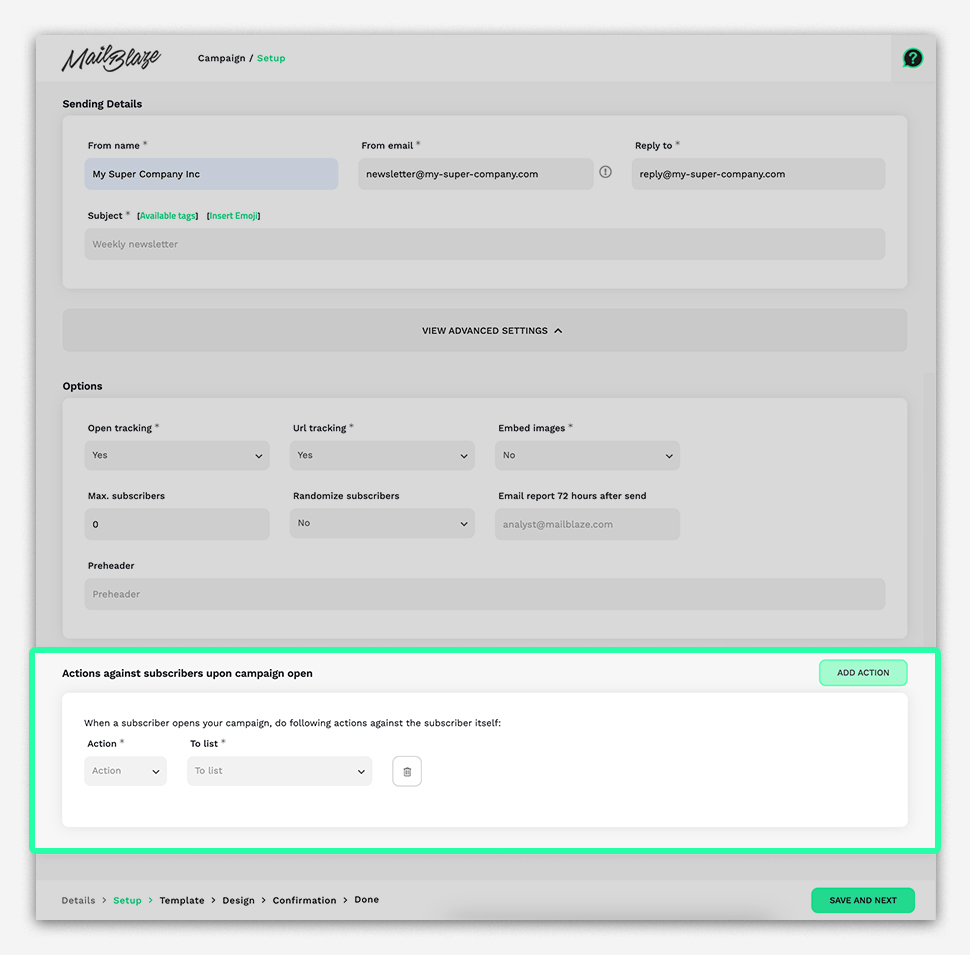
ACTIONS FOR SUBSCRIBERS THAT OPEN YOUR EMAIL
You have the option to copy or move a subscriber to another list after they open your campaign email. This can be useful in order to separate subscribers that engage with your email from those who don’t. An idea could be to send a follow up email that contains content that relates to the campaigns they’ve engaged with the most.
NOTE: We highly recommend that you create a second list and copy the subscribers to that list instead of moving them. This will keep your current campaign stats in place, but still give you the ability to engage with your audience the way you want. This is definitely the best way to do this as moving your subscribers can lead to other complications - for example when a subscriber who has been moved tries to unsubscribe they will not be able to as they won’t belong to the list that you’re sending to.
To copy the subscribers who open this campaign to a secondary list, select ADD ACTION, select COPY from the Action dropdown menu and select the list that you’d like to copy the subscribers to from the To list dropdown option.
Once you’re happy with the settings you have selected, select SAVE AND NEXT.
PICK A TEMPLATE
The next step is to pick a template for your campaign email. You’ll see a number of options in the tabs along the top of the page.
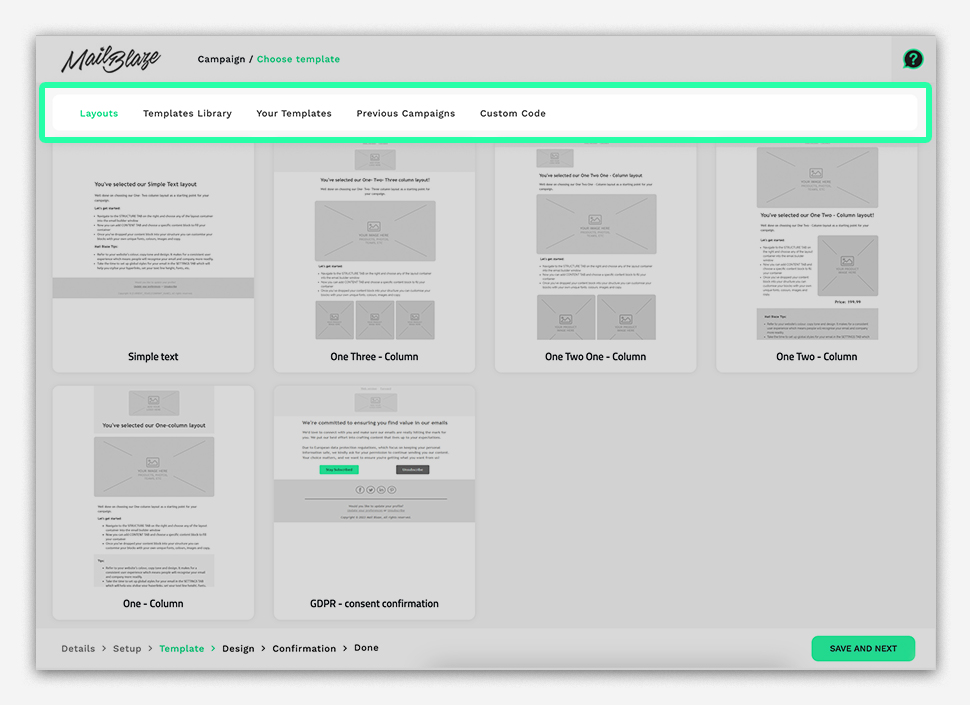
LAYOUTS: Simple system templates provide a great option for using a basic layout as a starting point. They are also ideal to use to get familiar with the template builder. You can choose from different templates with different column layouts which can easily be edited or removed as needed if you prefer.
TEMPLATES LIBRARY: This section contains all the templates you can browse in a gallery to get inspired and to see what the template builder is capable of creating. The templates are customisable and give you a great base to work from.
YOUR TEMPLATES: In the saved template section you will have the option to create templates for yourself in the TEMPLATES section using the email builder. You can then select the template directly without affecting the original template.
PREVIOUS CAMPAIGNS: This allows you to use your previous campaign templates again. Simply select the template you’d like to use and you’re on your way to sending your beautiful email campaigns in a flash.
CUSTOM CODE: If you have any pre-built HTML templates that you’d prefer to use instead of creating your own template using the email builder, you can import or paste it directly.
You have the option to paste the HTML, but please make sure that the images have absolute URLs to ensure they render properly.
If your images aren’t hosted on a server already, you can upload a zip file to upload and reference them on the Mail Blaze server. Your zip file needs to contain an index.html file with the _[UNSUBSCRIBEURL] tag included in the template and an images folder.
The third option is to import your HTML from a URL where your code is hosted. Simply paste the URL in the field provided.
Once you have selected your template, select SAVE AND NEXT.
USING THE TEMPLATE BUILDER
Now we’ll look at how you can create an email template.
You will use a drag-and-drop builder to build your layout and edit your content. It works by dragging content elements into the preview window and using the editing panel to customize those elements. It’s easy to use and a great way to get the look you want, without complicated code.
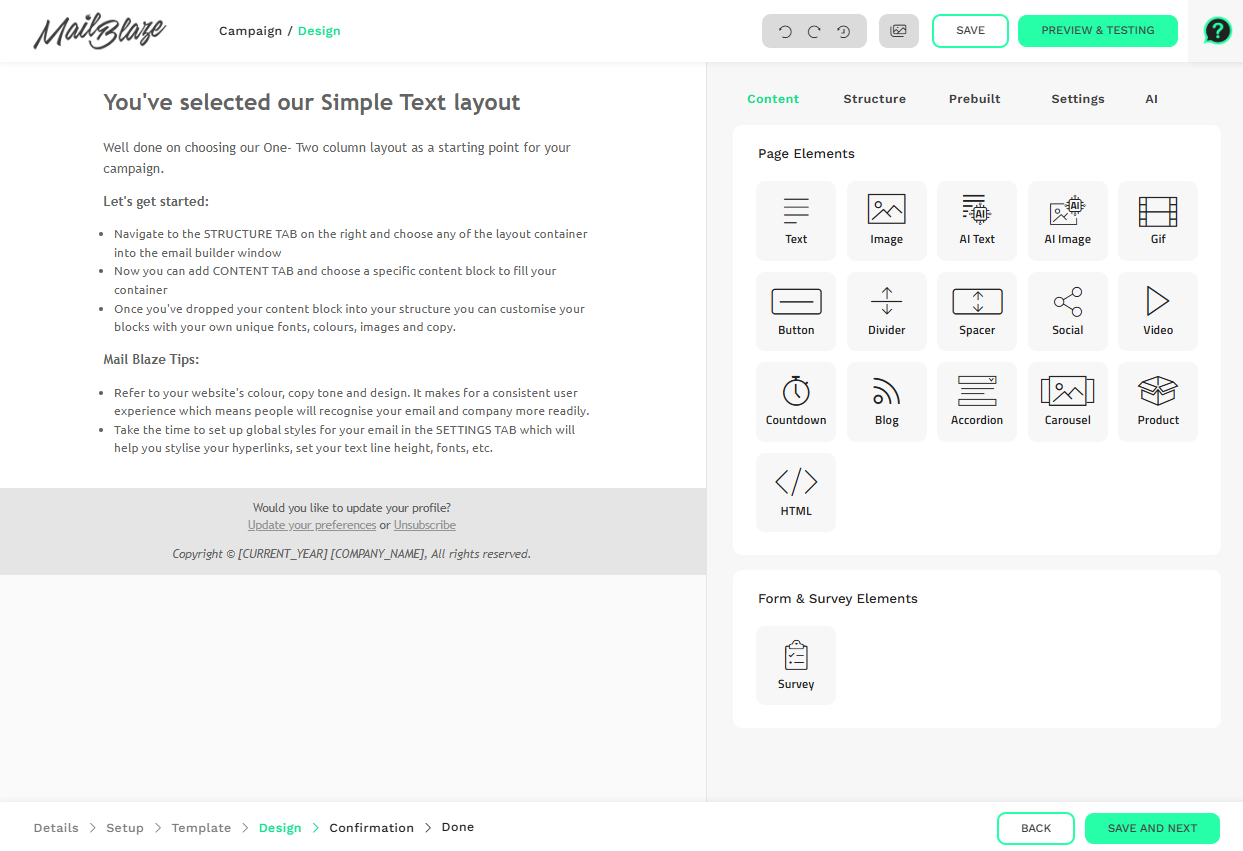
The sidebar panel contains 5 tabs:
CONTENT: Contains all content elements that can be dragged into the structure sections in the builder window.
STRUCTURE: Provides a list of layout sections that act as containers for your content elements. There is a variety of 1, 2, 3 and 4 column layouts available to organize and display your content. This makes it easy to organise your content.
PREBUILT: Allows you to import structures from another template/campaign. This helps you save time as you don’t have to create the entire email layout. It also ensures a consistent look for your email campaigns, strengthening your brand identity.
SETTINGS: Allows you to specify overall settings such as page and text styles. Setting your preferred styles here will make it easier to keep the design consistent across your template.
AI: Enables you to easily create compelling email content and images using our AI Content Blocks directly within the Mail Blaze platform. With the help of AI, you can generate creative ideas, designs, and content, enhancing the effectiveness of your campaigns. You can find out how to use our AI Content Blocks here.
USING STRUCTURE BLOCKS
Let’s start by clicking on the STRUCTURE tab and dragging a structure block in the template window as illustrated below.
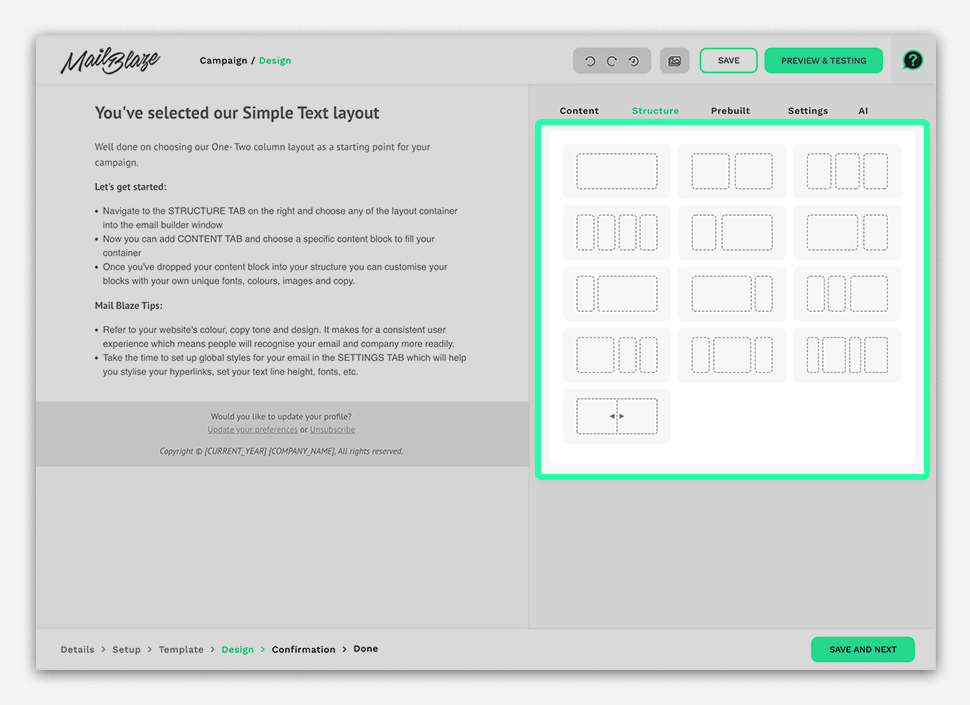
You have a variety of 1, 2, 3 and 4 column layouts to choose from. Single column layouts are great for large images and paragraphs, while multi-column layouts can be great for product listings and images that have complimentary text alongside it.
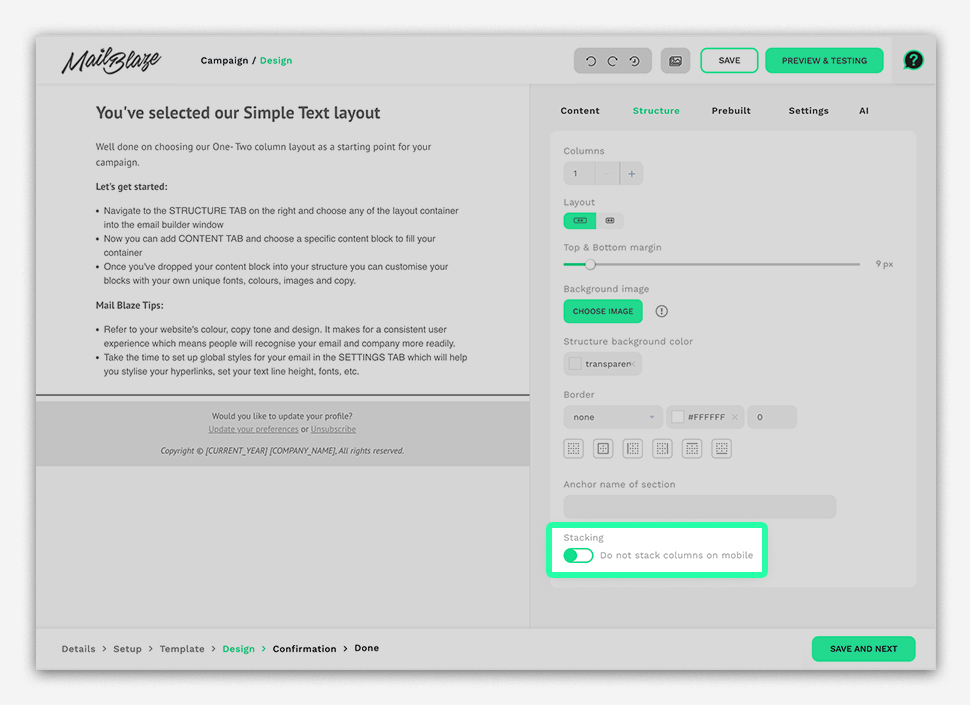
Once you’ve added your structure block, click on it (outside of the content element or space for the content element) and you should see a number of settings appear in the options panel.
Customize it by selecting a wide or narrow layout, uploading a background colour or image if you’d like or by selecting a border.
NOTE: Not all email clients support background images
You’ll see an option for stacking on mobile. What this means is that if you have a multiple-column layout, you can choose whether content elements display underneath or next to each other when viewed on a mobile screen.
There are many ways to use these layouts to create beautiful emails. Our template gallery showcases many types and styles of layouts, so feel free to use them for your own templates or to browse through them for inspiration.
HOW TO USE CONTENT ELEMENTS
- Select the CONTENT tab and drag a content element into the preview window.
- Select the new element in the preview window to make any adjustments in the editing panel.
- Use the editing panel to customize the content.
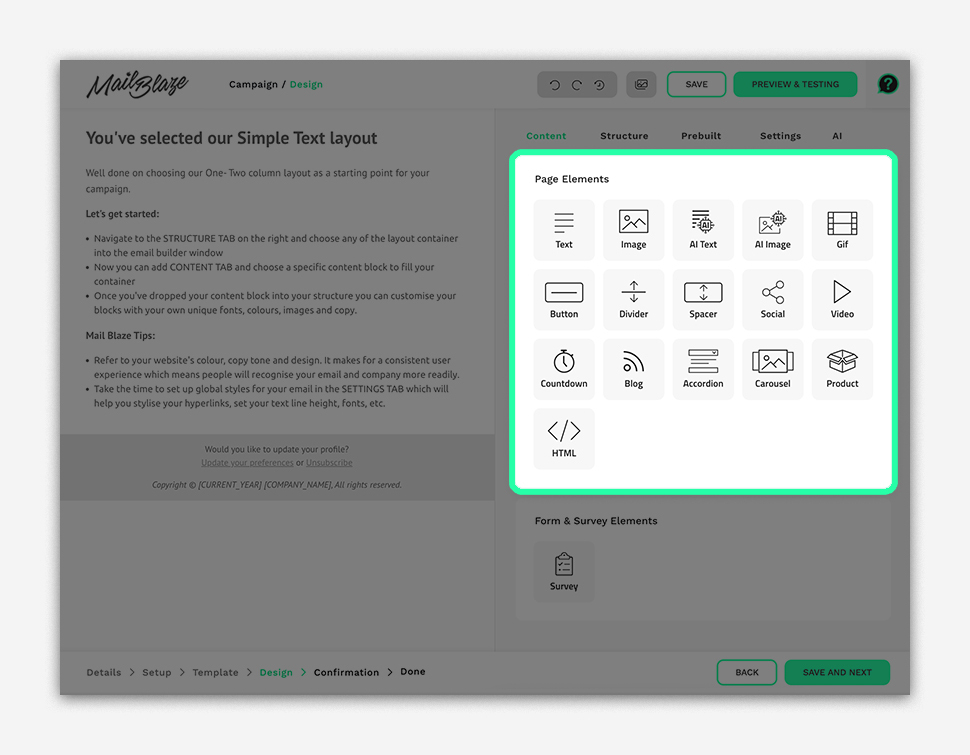
CONTENT BLOCKS
Take a look at all the content elements the builder has to offer. Using the content elements gives you the freedom to create beautiful emails easily. Each content element has a number of options available to customize your campaign and to represent your unique message.
We have 16 dedicated context blocks that our clients can use. Below you can find a brief explanation of what’s possible for each of them.
TEXT
Text elements provide a text editor that appears in the editing panel, allowing you to write and style your headings, paragraphs and links according to your needs.
NOTE: To make things easier, specify your text styles in your SETTINGS tab first so that you don’t need to repeat your styles for every new text element.
Select the type of text, such as headings or paragraphs, using the FORMAT option.
Style your text your way. You can make your text bold, underline it or change the size or apply other options as you need.
To add a link to a certain part of your text, highlight the text that you’d like to link and click on the LINK icon. A popup window will appear where you can select the link type, protocol and URL in the fields provided.
Click the SOURCE button to view the generated HTML for the block of text. You can even edit the HTML directly if you want to.
Click the INSERT button to add dynamic tags such as First Name (FNAME), email (EMAIL) or other available options from the dropdown menu. If your list has custom fields, then the corresponding tag will also be available to include in your template.
If you have already added your text, and would like to style it using the above options, simply highlight the text and use the available options.
IMAGES
Images are a great way to include some visual branding and content in your templates. Drag an image element into the preview window and click on the placeholder image to bring up the file manager. Upload or browse for the image that you’d like to add.
Link the image by adding the URL into the Image Link field. This is a great way to ensure your users can get to your website.
Should an image not display for some reason when the page opens, it’s good practice to add alternative text (alternative text should describe the image you are adding), this way a subscriber would know what the image would have visualised.
Use the other options to customize the style of your image.
AI TEXT Our AI Text content block allows you to create text with the power of AI. Using your well-thought out prompts the AI text content block generates the text content you request for use in your campaign, if you aren’t happy with the first results, you can request revisions easily.
AI IMAGE Our AI Image content block allows you to create AI generated images. Using your well-thought out prompts the AI image content block generates the imagery you request in a variety of styles you can choose from, if you aren’t happy with the first results, you can request revisions easily. The images are stored in the image library for you.
GIF Want to have some fun? You can add a GIF to your email by dragging the GIF element into the preview window, use the default animation and search for a GIF in the SEARCH GIF field in the editing panel.
BUTTONS Buttons are a way to show your subscriber what you want them to do next. Although you could use a link, it’s a powerful way to draw the attention to an action you want to emphasise.
Adding a button is simple, drag the button widget into the preview window, click on it to bring up the editing panel and customise the button to suit your desired style. You can change the button text and add a URL in the link field. You can also customize the colour, text size and alignment of a button to make it compliment your email or form.
DIVIDERS Separating two form elements using a divider draws a distinct line between them. Dividers are useful to use when you want to keep your elements organised.
SPACER Need to create some spacing between page elements? Simply drag the SPACER widget into that part of your form. You can adjust the size of the spacer by clicking on the spacing area in the preview window and dragging the spacer height slider in the editing panel to your desired height.
SOCIAL Get social and add your social media links to your email by dragging the SOCIAL widget into the preview window and click on the icons to bring up the editing panel. Select the icon style that best fits with your template design. Customize them further by specifying the alignment, size and margin.
Don’t forget to add the links to your social media pages by clicking the edit icon on the right-hand side. You can change the order of the icons by moving the icon to the position you want it to display.
You don’t have to add all the icons provided if you don’t use all the platforms. Simply click the icon you don’t want and delete it.
VIDEO A video widget creates an image of a video’s thumbnail frame. Both Youtube and Vimeo are supported.
Simply drag the VIDEO element into the preview window and click on it. Paste the video link into the field provided and style the image using the options available.
COUNTDOWN The countdown timer content block gives you the chance to add a countdown timer to your email campaign that counts down to a time you set. Please note this is an interactive feature and is not supported by all email clients.
BLOG If you have an RSS feed, you can use the Blog content block to connect to it and also customise the way the feed appears in your email campaigns.
ACCORDION The accordion content block allows you to create accordions to hide information (especially useful for long emails) just like you would on your website. Please note this is an interactive feature and is not supported by all email clients.
CAROUSEL The carousel content block allows you to create image carousels (like you would on your website) within your email campaigns. Please note this is an interactive feature and is not supported by all email clients.
PRODUCT The product content block was specifically designed for ecommerce stores to use. When you’ve connected your chosen products via our API, you’ll be able to select these products and insert them into your campaign seamlessly. There are various configurations for the data that you can display using the product content block, based on your data and needs.
HTML Are you a code wizard? Adding an HTML element allows you to add custom code to a section of your email. It’s important to be comfortable using code when choosing to apply this element as it can have unintended results if not tested properly.
SETTINGS
Customizing your settings section is a great way to ensure your content can easily stay consistent, especially with your paragraphs and buttons.
You can specify your background colour, fonts, text colours, button and link styles plus more in the settings tab which means you don’t have to customise these elements individually in the text editor every time.
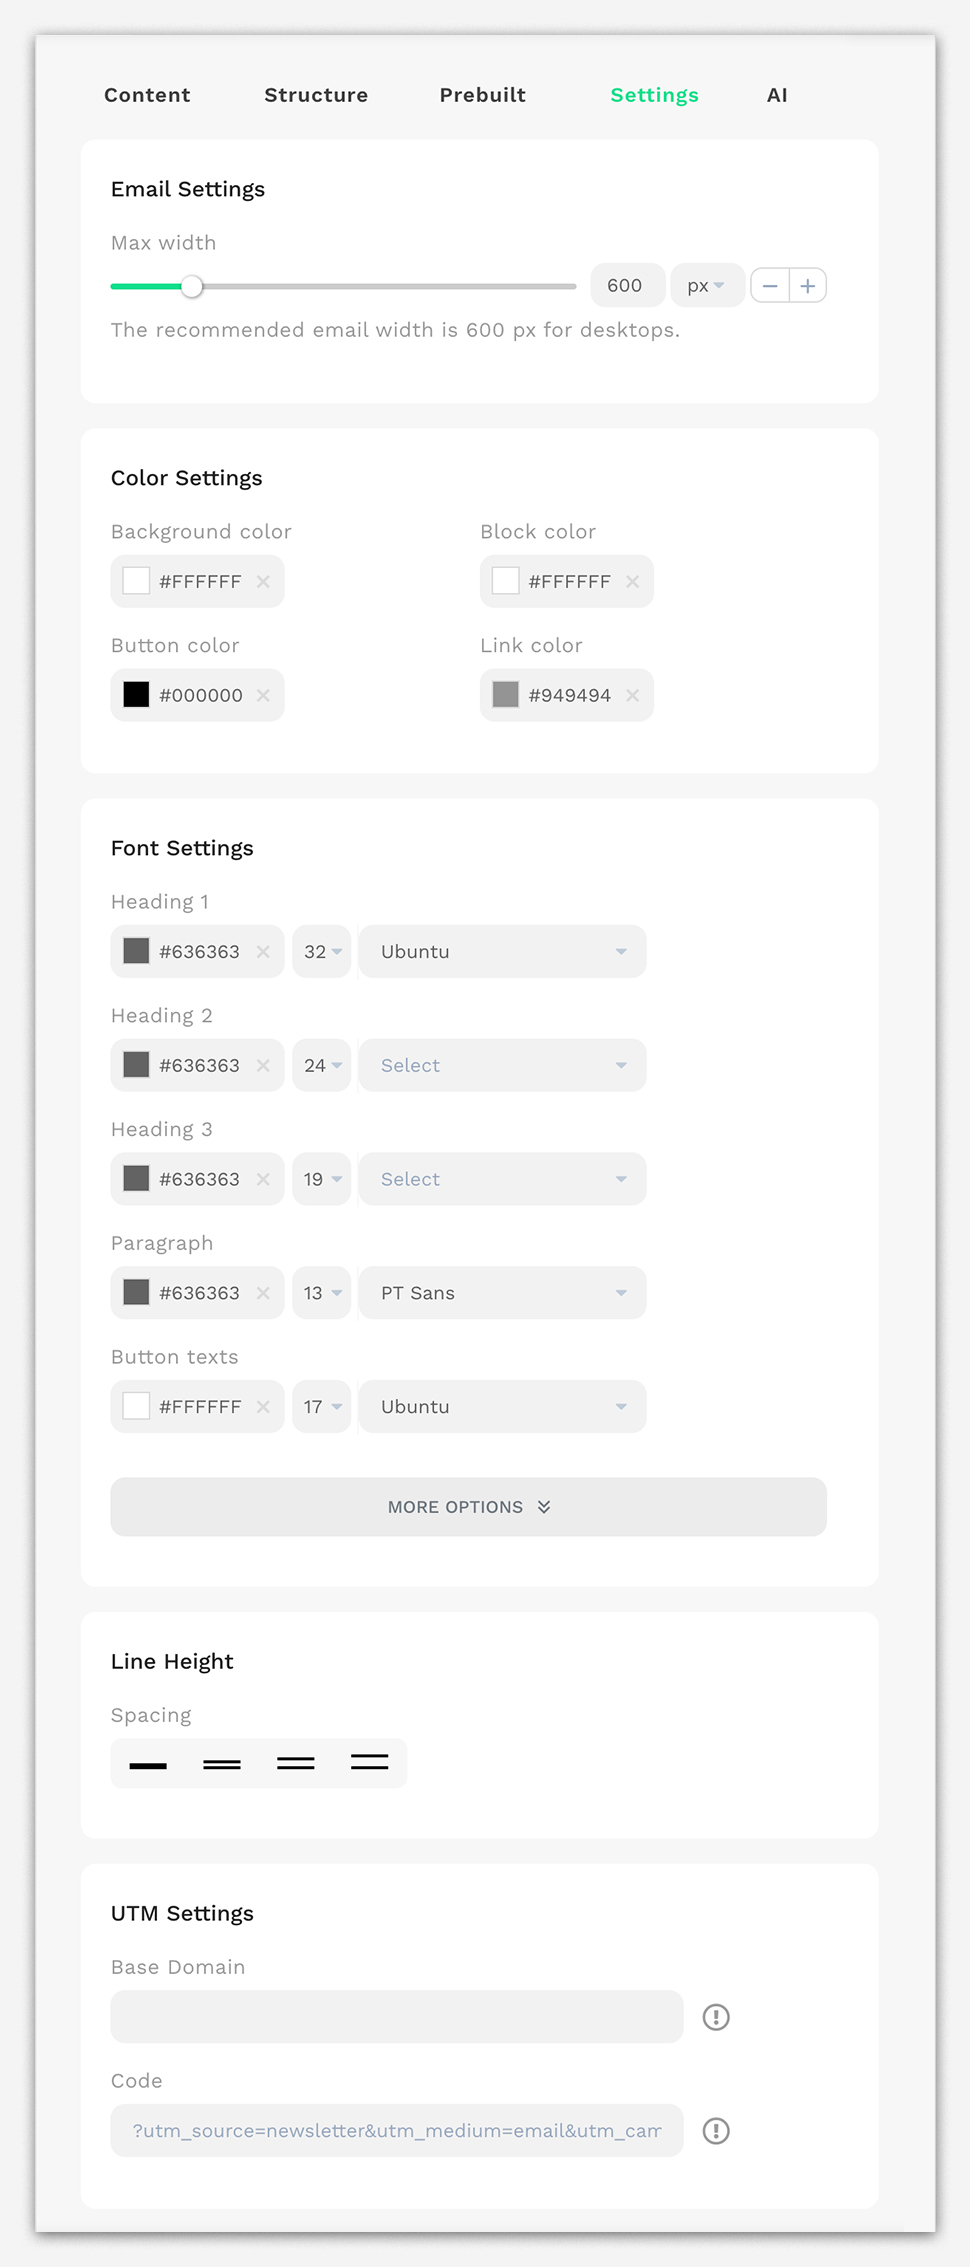
MAX WIDTH It is recommended to keep your template 600px as this is the optimal width to use for both large screens and mobile devices. You do have the option to make it wider if you have content that needs a little extra space, but a maximum of 700px is encouraged.
COLOR SETTINGS Set your background, block, button and link colors.
FONT SETTINGS Select your color, size and font family for your headings, paragraphs and buttons. By default your text will be a paragraph, but feel free to use headings in your text elements to specify different sections in your template. Complimentary buttons are a great way to get subscribers to click a link to your website.
NOTE: Although uploading a web font is available, we highly recommend using the fonts present in the platform due to the limited support for various web fonts by email clients.
LINE HEIGHT Line height is the spacing in between the top and bottom of your text.
UTM SETTINGS A UTM link can be incorporated into your campaign that connects your data to your Google Analytics account. If you want to gain insights into the behaviour and actions of your subscribers after they receive the campaigns, this proves to be a highly effective method. You can find more information about UTM’s here. Please note this does not create unique UTM links per content element.
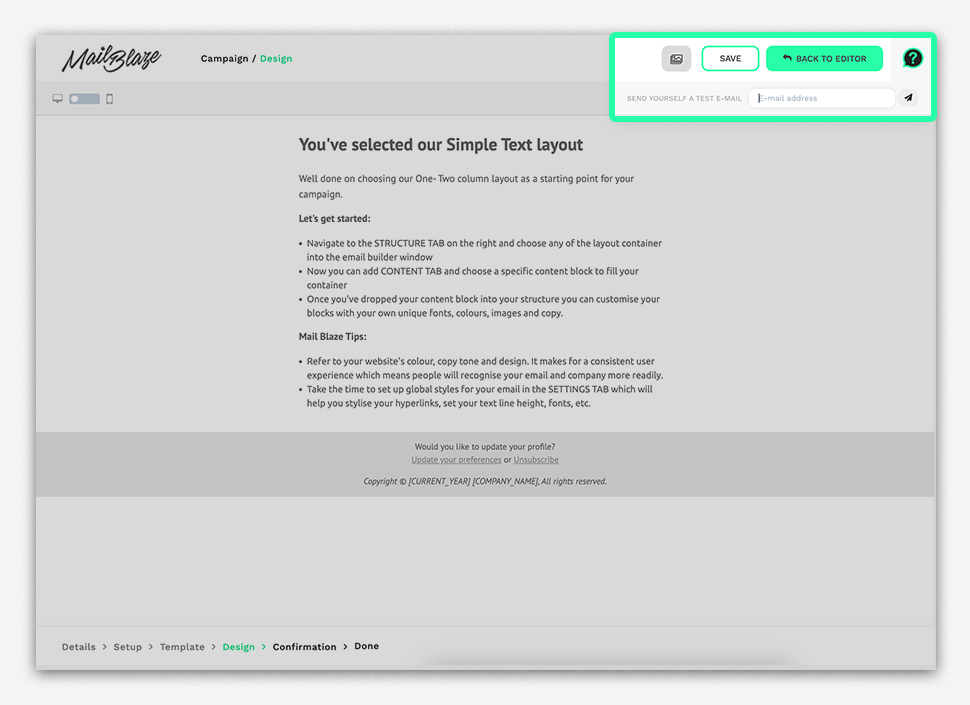
PREVIEW AND TESTING
Now that you have put your template together, it’s time to make sure that it looks as intended when a subscriber receives it in their inbox. Select PREVIEW AND TESTING.
You’ll see your template in the preview window. Enter your email address in the text field in the top right corner and send yourself a test mail.
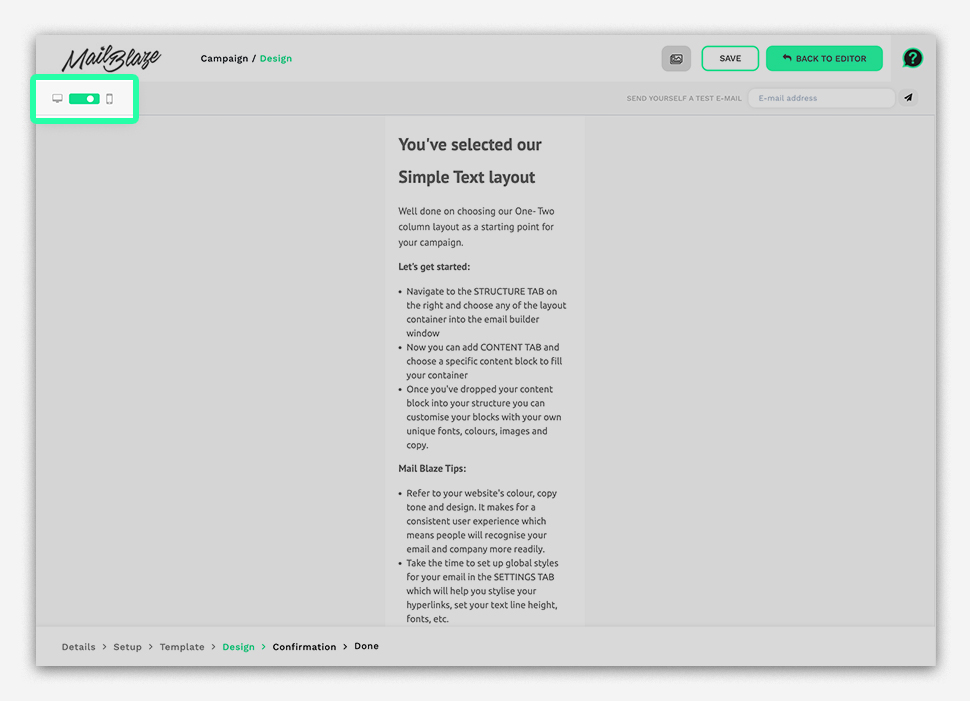
To view the mobile version of your template, click the toggle option in the top left corner to the mobile icon.
Select BACK TO EDITOR to go back to the template builder.
Once you’re happy with your template and are ready to send your campaign out, select SAVE AND NEXT.
SCHEDULE YOUR CAMPAIGN
On the confirmation page, you’ll see the overview information of your campaign. Make sure that all information is correct before you send your email out.
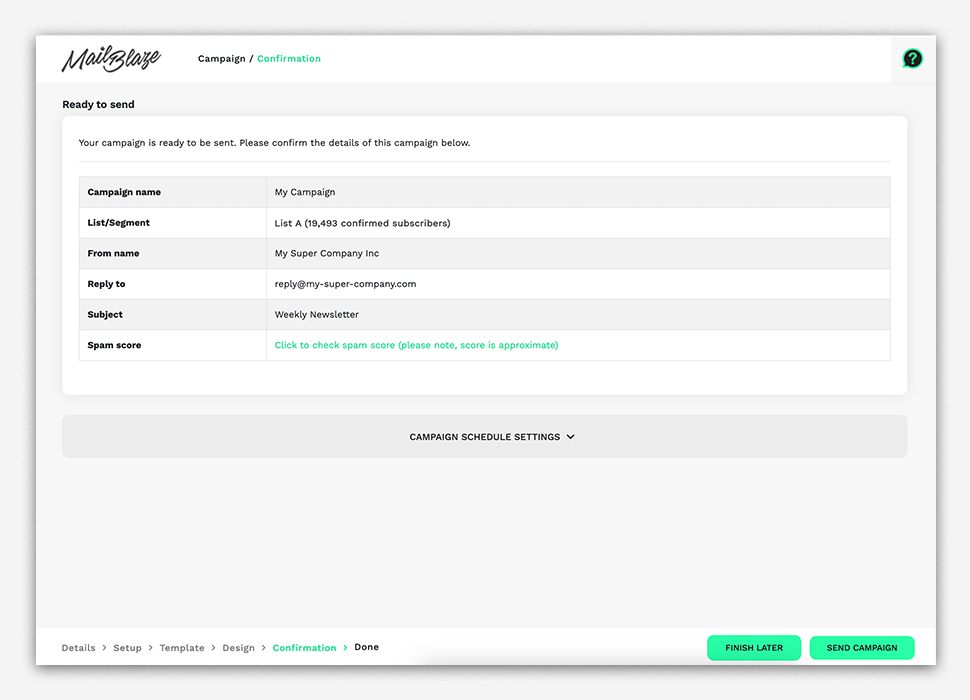
SPAM SCORE
To assess the likelihood of an email being categorised as spam by filters, check the Spam Score of your campaign. The Spam Score implemented in the platform involves the use of ChatGPT. It also provides suggestions on how to improve your email campaigns which can lead to a higher chance of your emails reaching subscribers' inboxes. While ChatGPT is advanced, it may struggle with context, potentially leading to misinterpretation of certain content.
CAMPAIGN SCHEDULE SETTINGS
To schedule your campaigns you can select the CAMPAIGN SCHEDULE SETTINGS button to view the advanced settings.
Select the Send at text field to bring up the date-picker. Select the date and time that you’d like the campaign to be sent out.
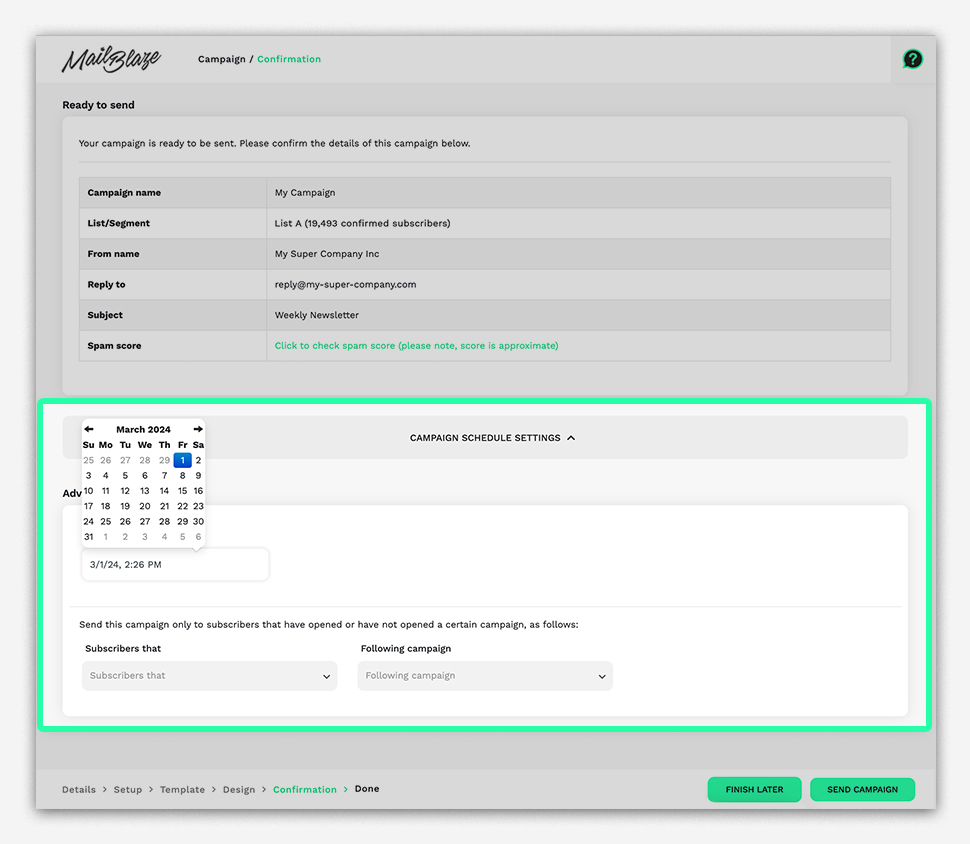
Next, select SEND CAMPAIGN. That’s it! Your campaign is scheduled to send out. If you’ve realized that you need to make a change or that you’re not ready to send your campaign out just yet, simply select FINISH LATER.
ADVANCED OPTIONS
This provides you with the option to send the campaign exclusively to subscribers who have either opened or not opened a specific campaign.
Sending follow-up campaigns offers a chance to further connect with your audience. It allows you to build on the momentum generated by a previous email that was opened, reinforcing your message or introducing additional information. You also have the option to send another campaign to subscribers that haven’t opened a previous campaign, however, it's important to be careful about when you do it. We recommend not to send another campaign too soon after the initial one to allow subscribers sufficient time to open and engage with the initial content.
As before, once all of your settings are in place, select SEND CAMPAIGN or FINISH LATER to continue working on your email campaign.